'My dearest Wilhelmine,
It seems that old Fritz does indeed value this front. I have received a good deal of reinforcements and have gone over to the attack. The enemy do not know what has hit them as we forced their outposts two days ago...'
 |
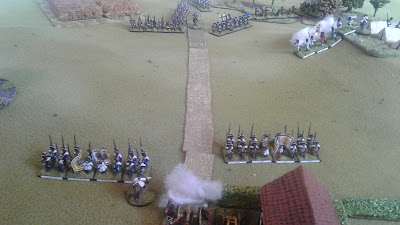
| The Kleist and Bahr Grenadiers advance towards the enemy. |
Flicking back through some old issues of Practical Wargamer magazine I came across a set of rules by Donald Featherstone for the American Revolution (September/October 1995). They were based around percentage dice, and so I had a go at adapting them to the Seven Years War. I added in some command rules and tried to come up with something that would play quickly, and could fit on sheet of A4. I was intrigued by the possibilities that they offered and so gave them a go. This small battle in my ongoing campaign was fought using those rules.
 |
| The battlefield. The farm at the creek is the main Austrian outpost, with some grenzers camped on the hill to the right. The Austrians are unaware of any approaching enemy. |
 |
| The Prussian column arrives on the battlefield. The light brigade of jagers and Hussars moves through the woods to try to take the high ground. |
 |
| Now alert the Grenzers come out of their tents and open fire. |
 |
| And the main Austrian body is up and deployed as well. In the distance the Prussians take a bit of time to deploy through what must be uneven ground. |
 |
| The Prussians contest the summit of the hill, the grenzers barely surviving a flank attack from the Reusch hussars. |
 |
| Meanwhile the Austrians settle their battlelines. |
 |
| Face to face the two armies prepare to deliver massed volleys at each other. |
 |
| The contest is relatively even, the Prussians being forced back on their left, but successfully attacking on the right. |
 |
| The next Prussian attack pushes the Austrian right back as well, but the Hussars are forced to regroup on the hill. |
 |
| Austrian musketry keeps the Prussians at bay. The Freikorps and the Peterwardeiner Grenzers were both eliminated in this exchange. |
 |
| Simultaneously the battle around the farm rages. |
 |
| The battle ends with the Prussian Hussars smashing through the Austrian right flank and the Starhemberg regiment pushed into the creek behind their camp. |
The battle saw the Austrians outnumbered by only one unit, but they had a poorer command rating. I was happy with most aspects of the system, but I felt that I needed to class elite units with different percentages to line units. They already have greater survivability, being able to take more hits than a line unit, but they really needed to be harder to damage as well. The percentage dice also threw some interesting moments into the mix. Such as when the Austrians were being hard-pressed but then miraculously rallied and poured much more effective volleys into the Prussians, despite having been forced back. I guess it's feasible, but I much prefer the way that beaten units underperform in Honours of War or my Horse and Musket rules.
The one big success is the new command system which I've added to my Horse and Musket rules now. It is influenced by the Ganesha games system, and I guess, by Black Powder to a certain degree. Commanders are classified before the game as average, above, or below average. 2d6 are rolled and this determines how many moves each unit in the activating Brigade gets. A move will either be a straightforward move, a change of formation, or you can forgo one move in order to fire in the firing phase. I'm looking forward to trying it with my usual rules, which I will update again today on the Horse and Musket Rules page.
'So we have torn a gap in the Austrian lines and are now moving on their rear with all of our forces. God willing my next letter will bring news of a great victory.
Yours
Balthasar'
Nate


Cracking looking game Nate.
ReplyDeleteThanks Michael.
DeleteWhat a nice looking game...and a great write up!
ReplyDeleteThank you Phil. Glad you enjoyed it.
DeleteAwesome stuff Nate!
ReplyDeleteCheers Rodger.
DeleteI like the approach with command rules and the variability they introduce to movement. Did it change the way you played the game at all?
ReplyDeleteThe programming for both sides meant that the Prussians were always on the offensive and the Austrians were to defend their ground, so not so much how the game was played, but it definitely had an important effect on the outcomes. For instance, the Prussian left managed to deploy much faster than the right, and then very quickly the Prussian right organised itself and was in contact. I'm looking forward to trying them out in a big battle to see if they give the attackers the chance to try more in the way of shifting the point of attack.
DeleteThanks. It will be interesting to see how you next game goes.
DeleteThose old back issues come in handy for all sorts of stuff! Great looking game!
ReplyDeletePractical Wargamer is a constant source of inspiration, Gordon.
DeleteNifty little battle, Nathan! Well presented BatRep but the Austrians come up short. Are you favoring this set of rules to HoW?
ReplyDeleteThanks Jonathan. I wouldn't play these rules again until I've had a good amount of time to tweak them. I was intrigued by the possibility of using percentage dice and a set of one page rules. I don't think it will take much, but will need some thought. In the meantime I'll keep using my ever-changing Horse and Musket rules. I did like HoW, but I've come so far with developing the original Neil Thomas rules, I want to keep playing them.
DeleteThis comment has been removed by the author.
ReplyDelete